Port Forwarding - Sitecom - WL-342 (Sitecom Firmware)

Sitecom - WL-342 (Sitecom Firmware)
 
Port Forwarding Guide
For automatic port forwarding try Simple Port Forwarding

Step 1.

Some routers & modems work best with port forwarding if you have a static local IP.
Manually set your network interface card ( NIC ) to use a static ip address.
You can also download my FREE Simple Static IP tool to set it for you.

Step 2.

Open your favorite web browser and input your routers ip address in the address bar.
Please note that you must have the http:// in order to connect to your router/modem properly.

Need help finding you router IP address? Click here

Step 3.

Some router/modems require a username and/or password, if yours requires it, enter the routers username and password here.

If you have changed it and don't remember it you may have to reset your device to factory default using the reset button on most routers.

Step 4.

Once logged into your router click on "Advanced Settings"

Wait for the page to load and click on "Port Forwarding"


Click To View Full Picture

Step 5.

Put a check on "Enable Port Forwarding"

Enter the computers IP address in "Local IP"

Next select your "Type"

Next for "Port range" enter in the ports you would like to forward.
Example: 3300 - 3300
Example: 3000 - 4000

Give the entry a name under "Comment"

Click on "Add"

Repeat this step for any more ports you need forwarded.

Once done click "Apply"

All Done!


Click To View Full Picture

Port Forwarding - Sitecom - WL-340 (Sitecom Firmware)

Sitecom - WL-340 (Sitecom Firmware)
 
Port Forwarding Guide
For automatic port forwarding try Simple Port Forwarding

Step 1.

Some routers & modems work best with port forwarding if you have a static local IP.
Manually set your network interface card ( NIC ) to use a static ip address.
You can also download my FREE Simple Static IP tool to set it for you.

Step 2.

Open your favorite web browser and input your routers ip address in the address bar.
Please note that you must have the http:// in order to connect to your router/modem properly.

Need help finding you router IP address? Click here

Step 3.

Some router/modems require a username and/or password, if yours requires it, enter the routers username and password here.

If you have changed it and don't remember it you may have to reset your device to factory default using the reset button on most routers.

Step 4.

Once logged into your router click on "Advanced Settings"

Wait for the page to load and click on "Port Forwarding"


Click To View Full Picture

Step 5.

Put a check on "Enable Port Forwarding"

Enter the computers IP address in "Local IP"

Next select your "Type"

Next for "Port range" enter in the ports you would like to forward.
Example: 3300 - 3300
Example: 3000 - 4000

Give the entry a name under "Comment"

Click on "Add"

Repeat this step for any more ports you need forwarded.

Once done click "Apply"

All Done!


Click To View Full Picture

Port Forwarding - Sitecom - WL-328 (Sitecom Firmware)

Sitecom - WL-328 (Sitecom Firmware)
 
Port Forwarding Guide
For automatic port forwarding try Simple Port Forwarding

Step 1.

Some routers & modems work best with port forwarding if you have a static local IP.
Manually set your network interface card ( NIC ) to use a static ip address.
You can also download my FREE Simple Static IP tool to set it for you.

Step 2.

Open your favorite web browser and input your routers ip address in the address bar.
Please note that you must have the http:// in order to connect to your router/modem properly.

Need help finding you router IP address? Click here

Step 3.

Some router/modems require a username and/or password, if yours requires it, enter the routers username and password here.

If you have changed it and don't remember it you may have to reset your device to factory default using the reset button on most routers.

Step 4.

Once logged into your router click on "Advanced Settings"

Wait for the page to load and click on "Port Forwarding"


Click To View Full Picture

Step 5.

Put a check on "Enable Port Forwarding"

Enter the computers IP address in "Local IP"

Next select your "Type"

Next for "Port range" enter in the ports you would like to forward.
Example: 3300 - 3300
Example: 3000 - 4000

Give the entry a name under "Comment"

Click on "Add"

Repeat this step for any more ports you need forwarded.

Once done click "Apply"

All Done!


Click To View Full Picture

Port Forwarding - Sitecom - WL-312 (Sitecom Firmware)

Sitecom - WL-312 (Sitecom Firmware)
 
Port Forwarding Guide
For automatic port forwarding try Simple Port Forwarding

Step 1.

Some routers & modems work best with port forwarding if you have a static local IP.
Manually set your network interface card ( NIC ) to use a static ip address.
You can also download my FREE Simple Static IP tool to set it for you.

Step 2.

Open your favorite web browser and input your routers ip address in the address bar.
Please note that you must have the http:// in order to connect to your router/modem properly.

Need help finding you router IP address? Click here

Step 3.

Some router/modems require a username and/or password, if yours requires it, enter the routers username and password here.

If you have changed it and don't remember it you may have to reset your device to factory default using the reset button on most routers.

Step 4.

Once logged into your router click on "Advanced Settings"

Wait for the page to load and click on "Port Forwarding"


Click To View Full Picture

Step 5.

Put a check on "Enable Port Forwarding"

Enter the computers IP address in "Local IP"

Next select your "Type"

Next for "Port range" enter in the ports you would like to forward.
Example: 3300 - 3300
Example: 3000 - 4000

Give the entry a name under "Comment"

Click on "Add"

Repeat this step for any more ports you need forwarded.

Once done click "Apply"

All Done!


Click To View Full Picture

Port Forwarding - Sitecom - WL-306 (Sitecom Firmware)

Sitecom - WL-306 (Sitecom Firmware)
 
Port Forwarding Guide
For automatic port forwarding try Simple Port Forwarding

Step 1.

Some routers & modems work best with port forwarding if you have a static local IP.
Manually set your network interface card ( NIC ) to use a static ip address.
You can also download my FREE Simple Static IP tool to set it for you.

Step 2.

Open your favorite web browser and input your routers ip address in the address bar.
Please note that you must have the http:// in order to connect to your router/modem properly.

Need help finding you router IP address? Click here

Step 3.

Some router/modems require a username and/or password, if yours requires it, enter the routers username and password here.

If you have changed it and don't remember it you may have to reset your device to factory default using the reset button on most routers.

Step 4.

Once logged into your router click on "Advanced Settings"

Wait for the page to load and click on "Port Forwarding"


Click To View Full Picture

Step 5.

Put a check on "Enable Port Forwarding"

Enter the computers IP address in "Local IP"

Next select your "Type"

Next for "Port range" enter in the ports you would like to forward.
Example: 3300 - 3300
Example: 3000 - 4000

Give the entry a name under "Comment"

Click on "Add"

Repeat this step for any more ports you need forwarded.

Once done click "Apply"

All Done!


Click To View Full Picture

Port Forwarding - Sitecom - WL-303 (Sitecom Firmware)

Sitecom - WL-303 (Sitecom Firmware)
 
Port Forwarding Guide
For automatic port forwarding try Simple Port Forwarding

Step 1.

Some routers & modems work best with port forwarding if you have a static local IP.
Manually set your network interface card ( NIC ) to use a static ip address.
You can also download my FREE Simple Static IP tool to set it for you.

Step 2.

Open your favorite web browser and input your routers ip address in the address bar.
Please note that you must have the http:// in order to connect to your router/modem properly.

Need help finding you router IP address? Click here

Step 3.

Some router/modems require a username and/or password, if yours requires it, enter the routers username and password here.

If you have changed it and don't remember it you may have to reset your device to factory default using the reset button on most routers.

Step 4.

Once logged into your router click on "Advanced Settings"

Wait for the page to load and click on "Port Forwarding"


Click To View Full Picture

Step 5.

Put a check on "Enable Port Forwarding"

Enter the computers IP address in "Local IP"

Next select your "Type"

Next for "Port range" enter in the ports you would like to forward.
Example: 3300 - 3300
Example: 3000 - 4000

Give the entry a name under "Comment"

Click on "Add"

Repeat this step for any more ports you need forwarded.

Once done click "Apply"

All Done!


Click To View Full Picture

Port Forwarding - Sitecom - Generic Guide (All Models)

Sitecom - Generic Guide 1 (All Models)
 
Port Forwarding Guide
For automatic port forwarding try Simple Port Forwarding

Step 1.

Some routers & modems work best with port forwarding if you have a static local IP.
Manually set your network interface card ( NIC ) to use a static ip address.
You can also download my FREE Simple Static IP tool to set it for you.

Step 2.

Open your favorite web browser and input your routers ip address in the address bar.
Please note that you must have the http:// in order to connect to your router/modem properly.

Need help finding you router IP address? Click here

Step 3.

Some router/modems require a username and/or password, if yours requires it, enter the routers username and password here.

If you have changed it and don't remember it you may have to reset your device to factory default using the reset button on most routers.

Step 4.

Once logged into your router click on "Advanced Settings"

Wait for the page to load and click on "Port Forwarding"
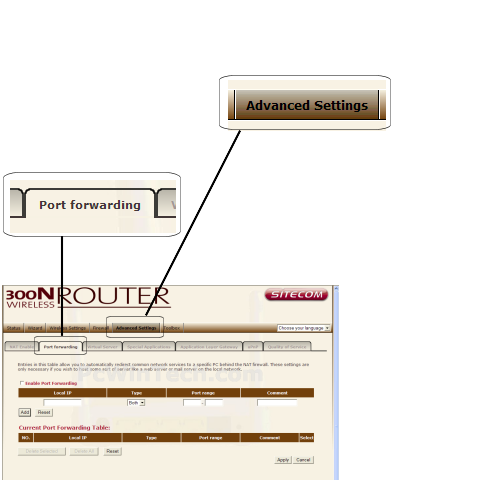

Click To View Full Picture

Step 5.

Put a check on "Enable Port Forwarding"

Enter the computers IP address in "Local IP"

Next select your "Type"

Next for "Port range" enter in the ports you would like to forward.
Example: 3300 - 3300
Example: 3000 - 4000

Give the entry a name under "Comment"

Click on "Add"

Repeat this step for any more ports you need forwarded.

Once done click "Apply"

All Done!
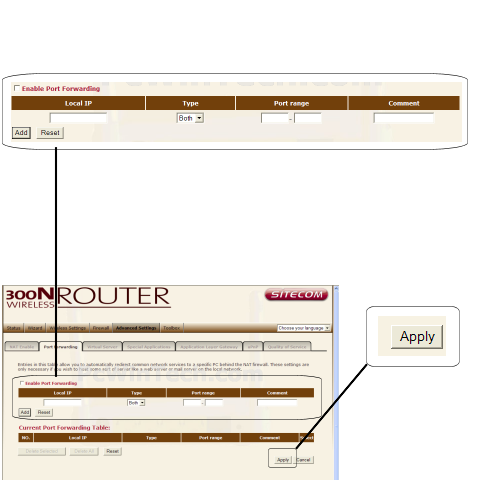

Click To View Full Picture

Port Forwarding - Sitecom Routers/Modems

If your router is not listed on this site or in the programs I can add them!
By adding your router I can create all the guides, screenshot databases and have your router work in my programs.
All you need to do is use my easy to use router screen capture program. This will make getting me the data easy and simple.
For more info click here.
Router Screen Capture


------------------------ Current Routers: ------------------------

Sitecom - Generic Guide (All Models)

What is the Generic Guide?
A lot of the routers use the same or very similar pages.
So if your router isn't listed, then the generic guide may help.
 

Drive Speedometer

Drive Speedometer

Windows 2000, XP, 2003, Vista, 7, 2008, 8

(Please Note: If your anti virus says it found a virus of any kind please know this is a false alarm. You can use www.virustotal.com to also see what other antivirus software says.
There are no viruses in any of the programs on this site. If your anti virus says it has one please submit the file in question to your anti virus maker, they will then scan the file themselves, see the program or setup is clean and update there virus def's to not cause the false alarm.)

This program is 100% FREE

v1.1.0
Mirror 1 (MajorGeeks.com) (Primary Download)
(More download options at the bottom of the page)
 

Drive Speedometer is a program I made to help monitor the current read and writes speeds of you hard drives.

Benefits include:
1. When your system is running slow yet your CPU usage and memory usage are fine, it is normally the hard drive being maxed out. Now you will be able to keep an eye on the hard drive performance.
2. When a drive is slowly dying it will run slower and slower. Being aware of what your normal drive speeds are and seeing those speed drop over time is a great indicator it is time to replace the drive.
3. Being a performance nut myself I like knowing what my system is doing. When I have a program doing some work and appears to be hung up I can see if it is still reading or writing to the drive. This way I know the program isn't hung up and is still working.

The program uses the Windows performance counters to pull the information. If you have disabled your performance counters I have included a reg file in the setup to enable them again. Run the reg file and reboot. Your performance counters will be working again.

I have also included some pre made bar fill graphics. Including some to use when running the monitor in compact mode. You can of course make your own as well.


Mirror 1 (MajorGeeks.com) (Primary Download)
Mirror 2 (FiberDownload.com)
Mirror 3 (FileCluster.com)
Mirror 4 (Programosy.pl)
Mirror 5 (Download3k.com)
Mirror 6 (OlderGeeks.com - USA)
Mirror 7 (Techspot.com - USA)


  (Direct Download)
Setup File Info: (1.85 MB)  (MD5 Hash - F59D21FA69285F0D8CD0C8594F9BF196)

Zip File (Non Setup) Portable Version (Direct Download)

What is MD5 hash? MD5 hash is a code made from every byte of the file, if the file is different in any way the md5 hash will change.
(HashTab is a great easy tool to use to check the md5 hash of files)


Screenshots - Engenius Routers/Modems

If your router is not listed on this site or in the programs I can add them!
By adding your router I can create all the guides, screenshot databases and have your router work in my programs.
All you need to do is use my easy to use router screen capture program. This will make getting me the data easy and simple.
For more info click here.
Router Screen Capture


------------------------ Current Routers: ------------------------

Pages

Subscribe to PcWinTech.com™ RSS