Screenshots - Linksys - RV042 (Linksys Firmware)

Screenshots - Linksys - WAG354G (Linksys Firmware)

Screenshots - D-Link - WBR-2310 (D-Link Firmware)

D-Link - WBR-2310 (D-Link Firmware)


Screenshot Database

Some screenshots have small distortions that were used to blur out personal info such as IP addresses and usernames.
(Click on a picture to view its full size.)


Setup - Internet

Setup - Wireless Settings

Setup - Network Settings

Advanced - Virtual Server

Advanced - Port Forwarding

Advanced - Application Rules

Advanced - Network Filter MAC

Advanced - Website Filter

Advanced - Firewall Settings

Advanced - Advanced Wireless

Advanced - Network Settings

Tools - Admin

Tools - Time

Tools - System

Tools - Firmware

Tools - DDNS

Tools - System Check

Tools - Schedules

Tools - Log Settings

Status - Device Info

Status - Log

Status - Stats

Status - Wireless

Support

Screenshots - D-Link - G604T (D-Link Firmware)

Screenshots - D-Link - DSL-G624T (D-Link Firmware)

Screenshots - D-link - DSL-G604T (D-Link Firmware)

D-link - DSL-G604T (D-Link Firmware)


Screenshot Database

Some screenshots have small distortions that were used to blur out personal info such as IP addresses and usernames.
(Click on a picture to view its full size.)


Home

Advanced - UPnP

Tools - Admin

Help

Home - Wireless

Home - WAN

Home - LAN

Home - DHCP

Home - DNS

Home - Dynamic DNS

Status - ADSL

Status - Statistics

Status - DHCP Clients

Advanced -
Virtual Server

Advanced -
SNMP

Advanced -
Filters

Advanced - Bridge Filters

Advanced - Routing

Advanced - DMZ

Advanced - Firewall

Advanced - RIP

Advanced - PPP

Advanced - ADSl

Advanced - ATM VCC

Advanced -Wireless Management

Tools - Firmware

Tools - System

Status - Device Info
   

Screenshots - D-Link - DSL-2640T (D-Link Firmware)

D-Link - DSL-2640T (D-Link Firmware)


Screenshot Database

Some screenshots have small distortions that were used to blur out personal info such as IP addresses and usernames.
(Click on a picture to view its full size.)


Home

Advanced - UPnP

Advanced - Virtual Server

Advanced - LAN Clients

Advanced - SNMP

Advanced - Filters

Advanced - Bridge Filters

Advanced - Routing

Advanced -
DMZ

Advanced - Parent Control

Advanced - Firewall

Advanced - RIP

Advanced - ADSL

Advanced - ATM VCC

Advanced - QoS

Advanced - Wireless Management

Advanced - Wireless Performance

Tools - Admin

Tools - Time

Tools - Remote Log

Tools - System

Tools - Firmware

Tools - Miscellaneous

Status - Log

Status - Statistics

Status - ADSL

Help

Wireless Setup - Actiontec - GT704-WG (Verizon Firmware)

Actiontec - GT704-WG (Verizon Firmware)


Wireless Setup Guide

Note: When setting up or changing your wireless settings it is a good idea to be plugged into the router with your network cable and not your wireless connection.
          If you are using your wireless connection and make any changes you will lose you wireless connection.

Special Note:
The wireless is preset at the factory to on and WEP 64/40 bit and the SSID and WEP Key are firmware provided to each unique router MAC address. A sticker on the bottom is provided to ID each of these in this order (top to bottom) MAC / WEP /SSID. Reset brings it all back to the sticker values.

Step 1.

Open your favorite web browser and input your routers ip address in the address bar.
Please note that you must have the http:// in order to connect to your router/modem properly.

Need help finding you router IP address? Click here

Step 2.

Enter your username and password and click 'OK'


Click To View Full Picture

If you don't know it you can check our list of default router and modem password list here.

If you have changed it and don't remember it you may have to reset your device to factory default using the reset button on most routers.

Step 3.

Once logged into your router click on "Wireless Settings".

Then click on 'Basic Security Settings'


Click To View Full Picture

Step 4.

For 'Wireless' choose 'On'

For 'SSID' set a name you would like to call your wireless.
What you put here is what will show up when you are searching for a wireless connection.

For 'Channel' choose 'Automatic'

Now choose 'WEP'

For 'Select a 'WEP Key' choose '64/40 bit' & 'Hex'

For 'Key Code' enter a password for your wireless, Alpha numeric chars only.

Once all setting are set click 'Apply'


Click To View Full Picture

All done!


Port Forwarding - Actiontec - GT704WG (Verizon Firmware)
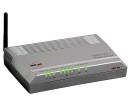
Actiontec - GT704WG (Verizon Firmware)


Port Forwarding Guide
For automatic port forwarding try Simple Port Forwarding

Step 1.

Some routers & modems work best with port forwarding if you have a static local IP.
Manually set your network interface card ( NIC ) to use a static ip address.
You can also download my FREE Simple Static IP tool to set it for you.

Step 2.

Open your favorite web browser and input your routers ip address in the address bar.
Please note that you must have the http:// in order to connect to your router/modem properly.

Need help finding you router IP address? Click here

Step 3.

Enter your username and password and click 'OK'
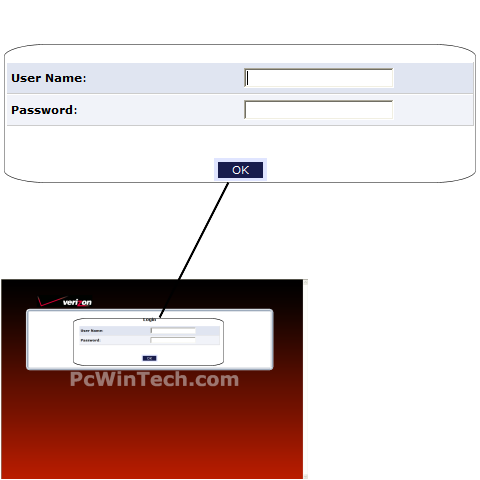

Click To View Full Picture

If you don't know it you can check our list of default router and modem password list here.

If you have changed it and don't remember it you may have to reset your device to factory default using the reset button on most routers.

Step 4.

Once logged into your router click on "Firewall Settings"

Set the firewall to 'Minimum Security' to allow Inbound connections.

Now Click 'Apply'

When the page is done reloading click on 'Port Forwarding'
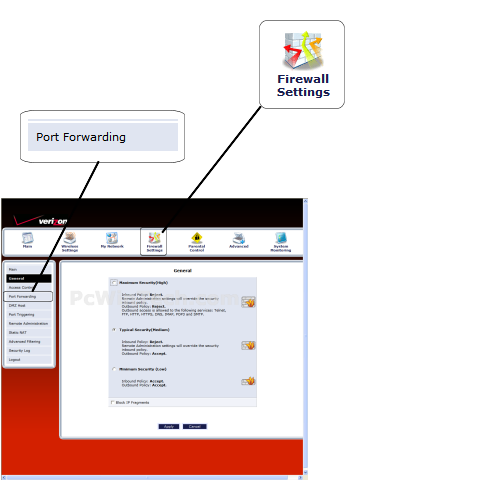

Click To View Full Picture

Step 5.

Click 'Add'
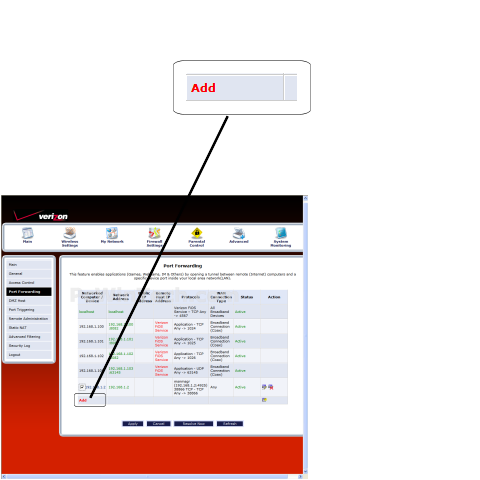

Click To View Full Picture

Step 6.

For Protocol click on 'Add'
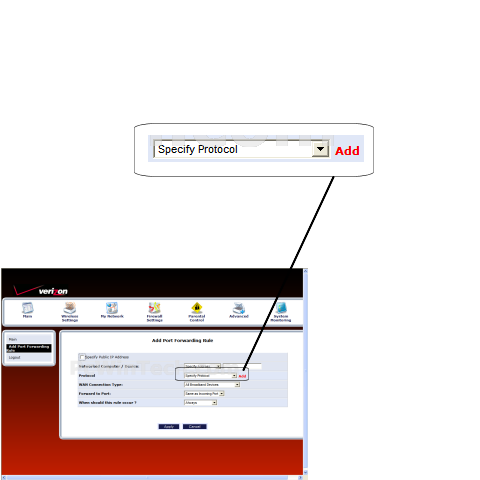

Click To View Full Picture

Step 7.

Click 'Add Server Ports'
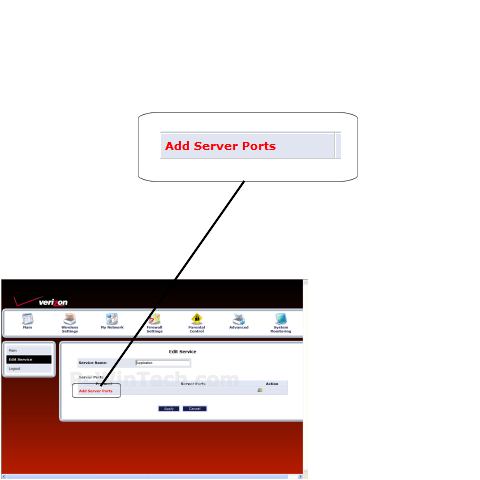

Click To View Full Picture

Step 8.

For 'Protocol' choose your protocol, normally TCP or UDP.

For 'Source Ports' choose 'Any'

For 'Destination Ports' Choose either 'Range' or 'Single' then enter the ports to be forwarded.
Example: 2100 or 2100 - 2105

Click 'Apply'
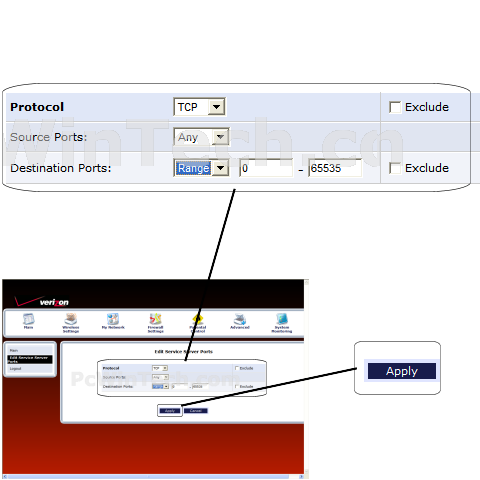

Click To View Full Picture

Step 9.

If you have more ports to add repeat steps 7 & 8.

Once all ports have been added give the service a name.
For 'Service Name' give your entry a unique name.

Now click 'Apply'
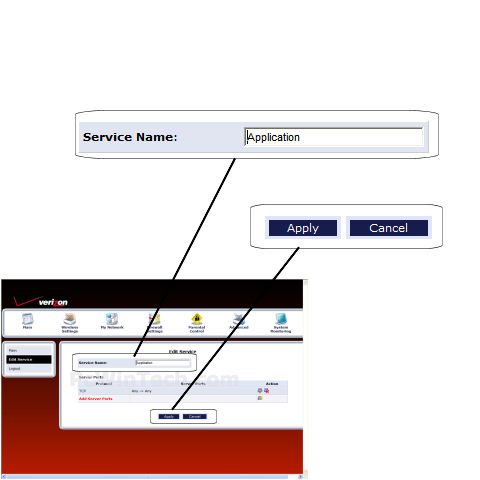

Click To View Full Picture

Step 10.

For 'Networked Computer / Device' choose 'Specify Address' and then input the local IP address to forward the ports to.

For 'WAN Connection Type' choose 'All Broadband Devices'

For 'Forward to Port' choose 'Same as Incoming Port'

For 'When should this rule occur' choose 'Always'

Click 'Apply'
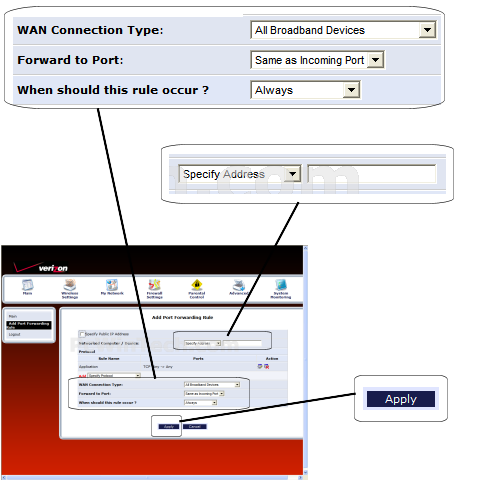

Click To View Full Picture

All done!


Wireless Setup - Actiontec - GT701-WG (Qwest Firmware)

Actiontec - GT704-WG (Qwest Firmware)


Wireless Setup Guide

Note: When setting up or changing your wireless settings it is a good idea to be plugged into the router with your network cable and not your wireless connection.
          If you are using your wireless connection and make any changes you will lose you wireless connection.

Step 1.

Open your favorite web browser and input your routers ip address in the address bar.
Please note that you must have the http:// in order to connect to your router/modem properly.

Need help finding you router IP address? Click here

Step 2.

Some router/modems require a username and/or password, if yours requires it, enter the routers username and password here.

If you don't know it you can check our list of default router and modem password list here.

If you have changed it and don't remember it you may have to reset your device to factory default using the reset button on most routers.

Step 3.

Once logged into your router click on "Setup / Configuration".


Click To View Full Picture

Step 4.

Under "Setup / Configuration" click on 'Advanced Setup' and when the page loads click the 'Begin Advanced Setup' button.

Click on 'Wireless Settings' on the left

For 'Wireless' choose 'On'

For 'ESSID' set a name you would like to call your wireless.
What you put here is what will show up when you are searching for a wireless connection.

For 'Security' choose 'WPA'

Now click 'Next'


Click To View Full Picture

Step 5.

For 'PSK String' put in a password of your liking, min 8 chars long


Click To View Full Picture

Step 6.

Now click on 'Wireless Advanced Settings' on the left.

For 'SSID Broadcast' choose 'Enable'

For '802.11b/g Mode' choose 'Mixed'

Now click 'Save and Restart' on the bottom left.


Click To View Full Picture

All done!


Pages

Subscribe to PcWinTech.com™ RSS