 |
Simple Internet Meter Help &
FAQ |
 |
Welcome to the help and FAQ page for Simple Internet Meter.
This page will try to explain every aspect of the program and answer the most
asked questions. If you have a question not covered by this page please post any
questions you have in the forums.
FAQ:
Q: How does Simple Internet Meter work?
A: The program works by using WinPcap (www.winpcap.org)
to monitor all packets going in and out of the selected adapter. By viewing the
packets the program is able to tell what is internet traffic and what is local
traffic. Windows does not provide an option to do this so the WinPcap low level
driver is needed to get this information. Many popular networking apps use winpcap such as Wireshark.
Q: My anti malware/anti virus program flags PacketX.dll and WinPcap as
threats.
A: The PacketX.dll is used in order for the program to work with WinPcap.
These are powerful tools and the side affect is some malware and other bad
programs use them as well. They are safe and you can view information on them on
the internet to see for yourself. Unfortunately many anti malware programs flag
every file a malware program uses. So safe files will get flagged as well. If
your anti malware or antivirus flags the files it would be a great idea to send
the files to them and let them see they are not threats. They should then update
their programs to no longer flag the. Windows Defender warns the user of WinPcap
but puts the warning as low. If you are using Defender make sure to tell it to
give WinPcap permission.
Q: I have lost my key code for the program, how can I get?
A: if you lose your key code just the contact page and provide your name
and email you purchased the program with. I will email you your key code.
Help & Information:
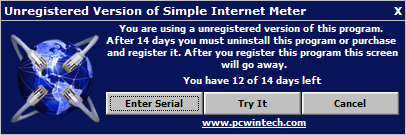
When you run the program for the first time a screen will show letting you
know you have a trial period. Once you buy & register the program this screen
will not show again. To test the program and try it out before deciding on
purchasing it simply click "Try It". The program will then continue like normal.
The program gives you a 14 day trial, nothing is restricted in the trial and it
is fully operational.
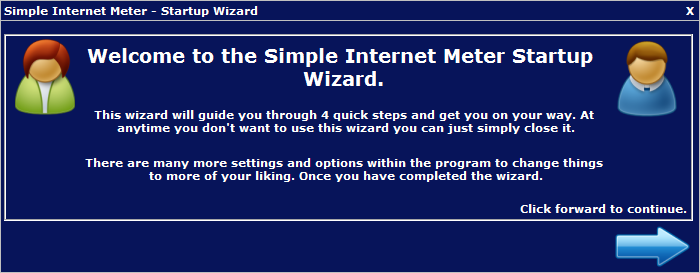
The first time you run the program a startup wizard will show. This is
designed to help new users get going easily and quickly. If for any reason you
do not wish to use the wizard you can simply close it by clicking on the "X".
Once the wizard is closed or completed it will not show again.
Once the wizard starts you are greeted with a welcome screen. Click the
forward arrow to start the first step.
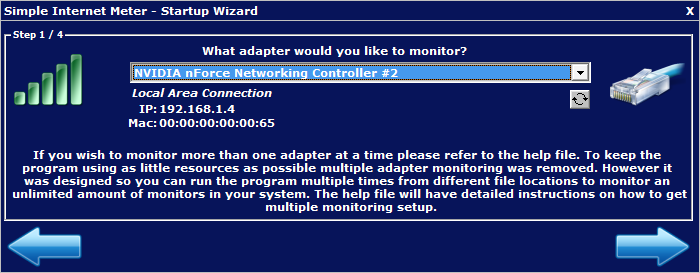
Step 1. This asks which adapter you would like to monitor. Choose which ever
adapter you like, normally users will choose the adapter (if they have more than
one) that their internet connection is going through.
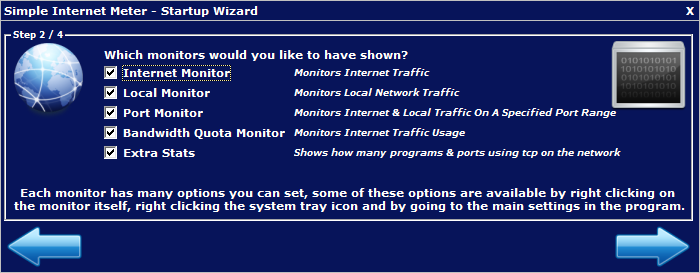
Step 2. You can choose which monitors you would like shown. You can always
changes these in the program with ease.
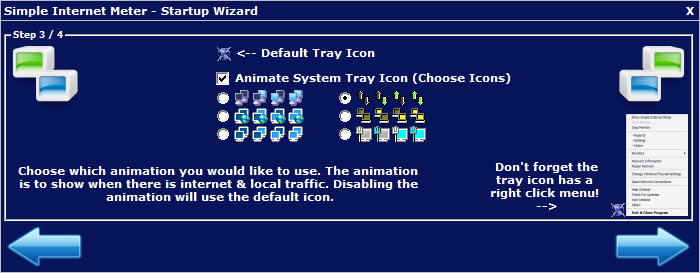
Step 3. The program will animated the system tray ion for you when there is
traffic. You have 6 choices to choose from and these can be changed at any time.
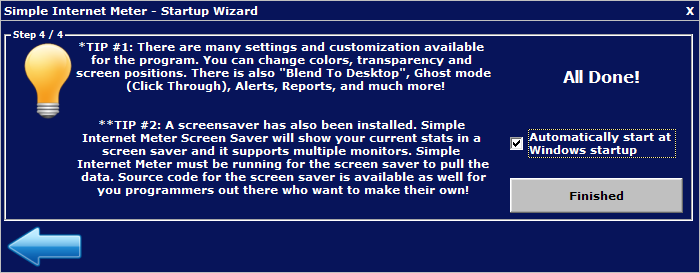
Step 4. All done! you can set if you would like the program to run when
windows starts up.
Once the program is running you have many options to set and choose from if
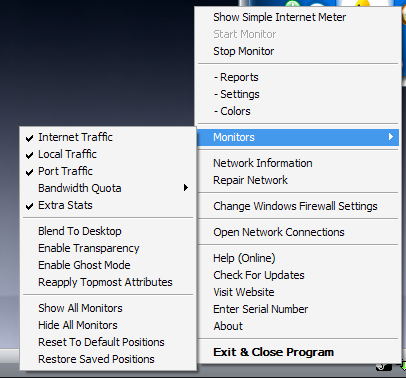
you wish. The system tray icon (by your clock) has a right click menu to show
you a lot of your options. You can also double left click to open the main
window of the program.
The menu also makes it easy for you to open your network connections, view
windows firewall settings, repair the network connection, and view the network
information such as IP and DNS servers. In windows XP these where easy to get to
with just a few clicks, since Windows Vista and Windows 7 it takes many more
steps to get to these sections. With them being on the right click menu this
makes them easier to get to once again.
You can access many things with the menu, such as the program settings,
reports, colors and much more.
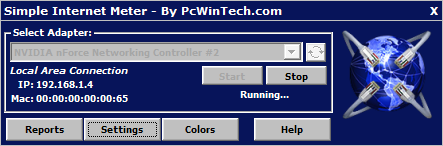
This is the main window of the program. It is a small simple interface, you
can choose your adapter, access reports, settings and colors and view the help
(this page).
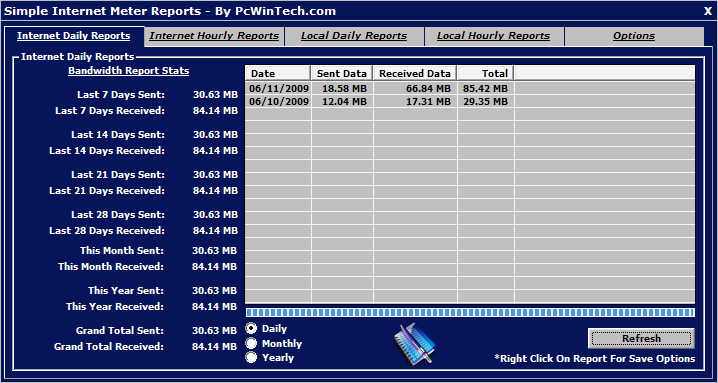
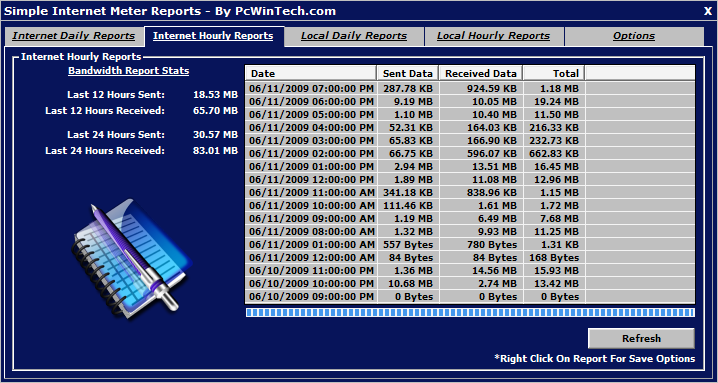
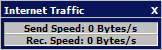
Reports. Simple Internet Meter can log daily and hourly totals for your
internet and local traffic. All the information is stored in the stats.mdb file.
This is a Microsoft Access database file. This format was chosen as many other
programs support access databases and gives advanced users easy access to their
data from other programs if they wish.
Daily Totals:
Hourly Totals:
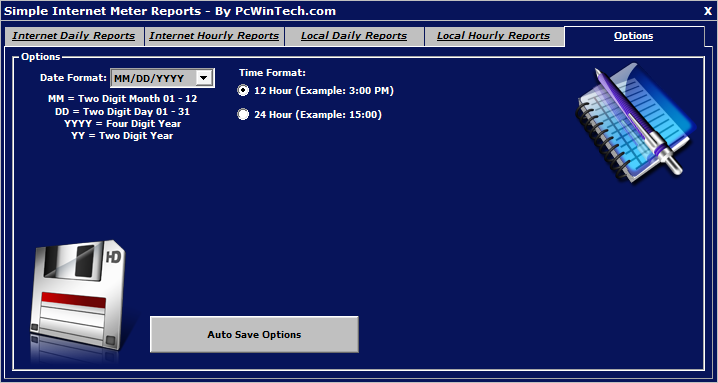
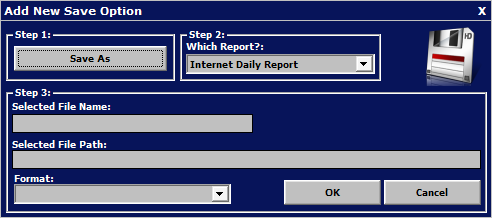
The report options let you set the date and time formats to your liking. You
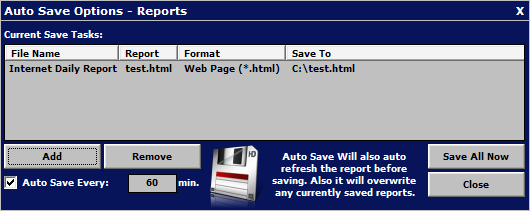
can also enable a auto save report feature that will auto save a selected report
to a file.
You can have as many auto saves as you like and set how often to save them.
Keep in mind that the reports are refreshed before they are saved, so as the
database grows this will require more CPU.
Program settings. This is where nearly all the program settings are stored.
General Setting.
In this section you can set if the program will start with windows, have the
main window minimized to the system tray and to auto start the monitor when the
program starts up.
You can also set which icon to use in the system tray and what logging you want
(Daily & Hourly).
You can set what information shows up when you put your mouse over the tray
icon. There is a 128 char limit show selecting all the options wont be able to
fit.

Internet Monitor Settings.
The internet monitor works by looking at the incoming and outgoing packets.
Any packet not coming or going to the local network is counted as internet
traffic.
You can set to show the speed in bytes or bits, and what your speed is for
your internet connection. This is simply used to help draw the usage bars on the
monitor.
Even if you have the monitor hidden the stats are still grabbed, so you can
safely have the monitor closed and still keep track of usage.
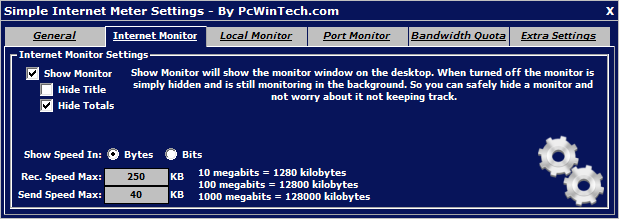
All options enabled.
 |
Hide Totals
 |
Hide Title
 |
Hide Title & Totals
 |
Local Traffic Settings.
The local monitor works by looking at the incoming and outgoing packets. Any
packet coming or going to the local network is counted as local traffic.
Example: source IP 192.168.1.3 - destination IP 192.168.1.5 (so transferring
files from one computer to another in your home or office is local traffic)
You can set to show the speed in bytes or bits, and what your speed is for
your internet connection. This is simply used to help draw the usage bars on the
monitor.
Even if you have the monitor hidden the stats are still grabbed, so you can
safely have the monitor closed and still keep track of usage.
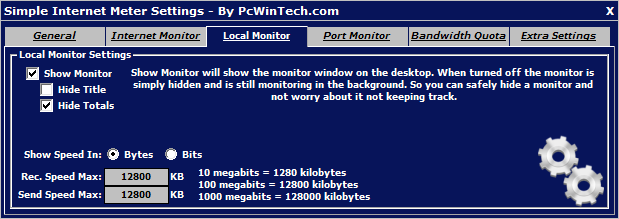
All options enabled.
 |
Hide Totals
 |
Hide Title
|
Hide Title & Totals
|
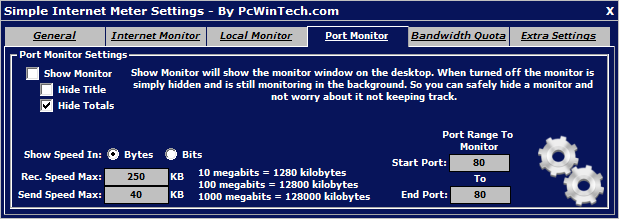
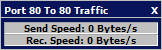
Port Traffic Settings.
The port monitor works by looking at the incoming and outgoing packets. Any
packet coming or going in the port range is counted.
Example: you connect to a website on port 80 the destination port is looked at,
as the website responds the source port is looked at.
You can set to show the speed in bytes or bits, and what your speed is for
your internet connection. This is simply used to help draw the usage bars on the
monitor.
Even if you have the monitor hidden the stats are still grabbed, so you can
safely have the monitor closed and still keep track of usage.
You can set what port range you would like to monitor. Currently only range
is supported do to performance issues, the program is meant to take as little
resources as possible.
Having a list of ports to watch, or even all of them would require many more
resources. There are 65535 TCP ports and 65535 UDP ports. Watching all of them
to keep track of usage would be a big task.
The program could do so if programmed to. This option will be looked at again in
future versions.
All options enabled.
 |
Hide Totals
 |
Hide Title
|
Hide Title & Totals
|
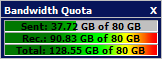
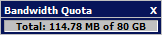
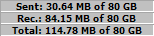
Bandwidth Quota Monitor Settings.
The bandwidth quota monitor keeps track of internet traffic only.
You can set a quota limit for how much data you send, rec. or both. You can
set it to kilobytes, megabytes, gigabytes and terabytes.
You can also have the quotas auto reset, such as on a certain hour of the day,
day of the week or day of the month.
You can also setup an alarm if any of the quotas are reached.
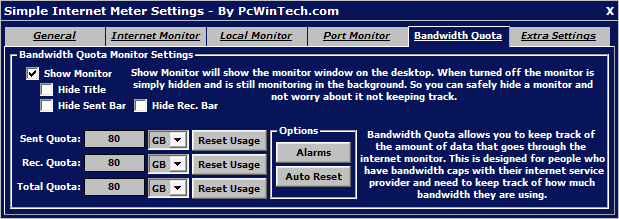
All options enabled.
 |
Hide Sent & Rec.
 |
Hide Title
 |
Hide Title, Sent & Rec.
 |
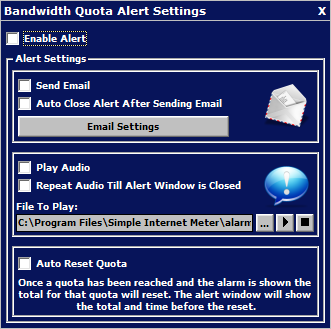
Bandwidth quota alert settings.
When a quota has been reached you can tell the program what to do. You can
have it send an email, play a audio file and also reset the quota usage to 0.
Each time an alert is triggered it is stored in the alerts.log file.
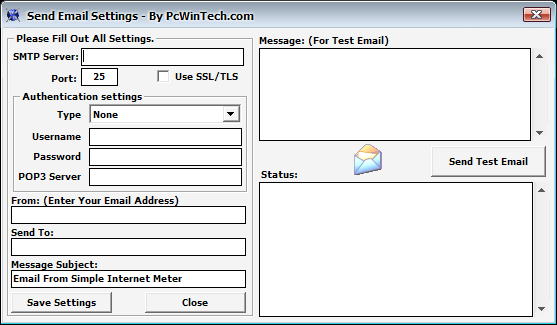
These are the settings for the email alerts. SSL/TLS are supported so it will
work with protect email servers such as gmail (Google).
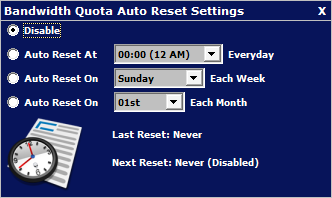
The auto reset options allows you to have the quotas reset automatically.
This is useful for people who are on capped bandwidth that resets at a certain
time.
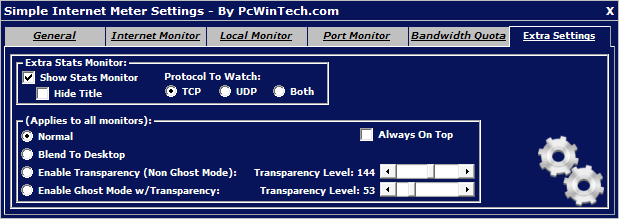
Extra Settings.
Here you can control the extra stats monitor and also some extra features
that apply to all the monitors.
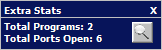
The extra stats monitor shows you how many programs are using the network
connection and how many ports are currently being used.
Blend to desktop mode will make the monitors blend to the desktop showing
only the text and bar outline. The rest of the monitor is transparent.
Transparency allows you to set how transparent to make the monitors.
Ghost mode makes the monitors click through, clicking on what's underneath them.
Show Title
 |
Hide Title
 |
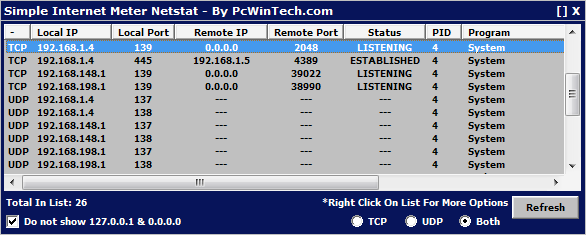
Netstats.
The netstats can be viewed from the extra stats monitor or by right clicking
on any of the monitors.
This shows what connections are currently on your computer and what programs are
making those connections.
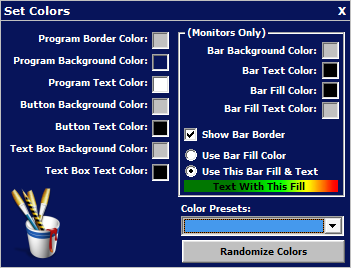
The program allows you to change the colors, making it fit more to your look
and feel.
Presets have been provided and also a reset to default colors in case you
need to reset the colors.
The randomize colors will randomly change all the colors.
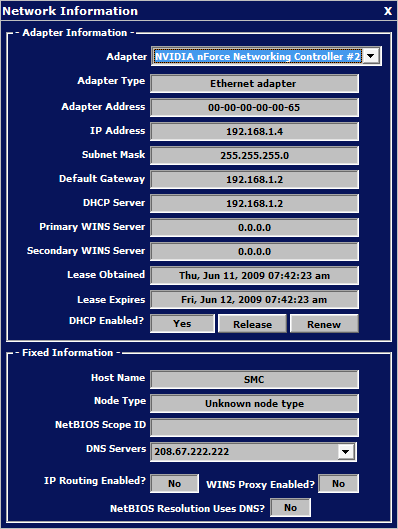
Shows current information about the adapters on your system.
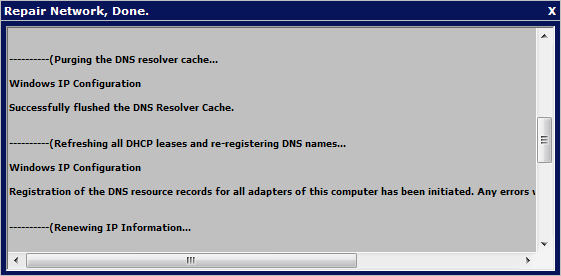
Repair network will repair your network by releasing the IP, flushing the
DNS, renewing your IP and registering the DNS.
This comes in handy if your DNS becomes corrupted or you need to renew your
IP. This is similar to the repair open in Windows.


